Work Better Than Yesterday!
Android的View绘制学习
1 什么是View
最初接触View的概念的时候应该是在大学学习JavaWeb的时候了,那时候学习到MVC模式,其中的V即是View,通常翻译为视图,即界面上的东西,GUI(Graphic User Interface)方面的控件,包括图形,窗口,组件等等。而在Android,它是比这些泛化概念而具体的一个类,从这个类衍生出几乎所有的图形界面,而Window又是另外的一个类。
引用网上一句话:
Android系统中的所有UI类都是建立在View和ViewGroup这两个类的基础上的。所有View的子类成为”Widget”,就是控件;所有ViewGroup的子类成为”Layout”,就是布局。View和ViewGroup之间采用了组合设计模式,可以使得“部分-整体”同等对待。ViewGroup作为布局容器类的最上层,布局容器里面又可以有View和ViewGroup。
View是最顶层的界面类,ViewGroup是继承View的抽象类,ViewGroup是一组view的集合。View又是所有界面的父类引用,View引用可以指向ViewGroup,实现了多态。
通常我们理解Activity为一个界面,那是不够准确的,真正的界面是View,Activity只是一个组件,它更像是一个控制器的角色,在Activity里面,我们只是调用了一个setContentView()的方法来把xml文件编写的界面使用。如下图所示,一个Activity含有一个Window,而这个Window的实例是PhoneWindow;Window包含了一个DecorView,这个DecorView才是正在看得见的界面。采用的是组合方式,Activity里面有mWindow这个属性,Window里面有mDecor这个属性。
在Activity的attach()里面会new出PhoneWindow来,同时也会设置Callback接口。通常这个callback有一个用法,在setContentView()最后就会回调callback的onContentChanged()方法通知界面已经设置完毕了,Activity里面的这个方法是空实现,实际上,这告诉我们是可以在这个时候调用findViewsById()方法了。
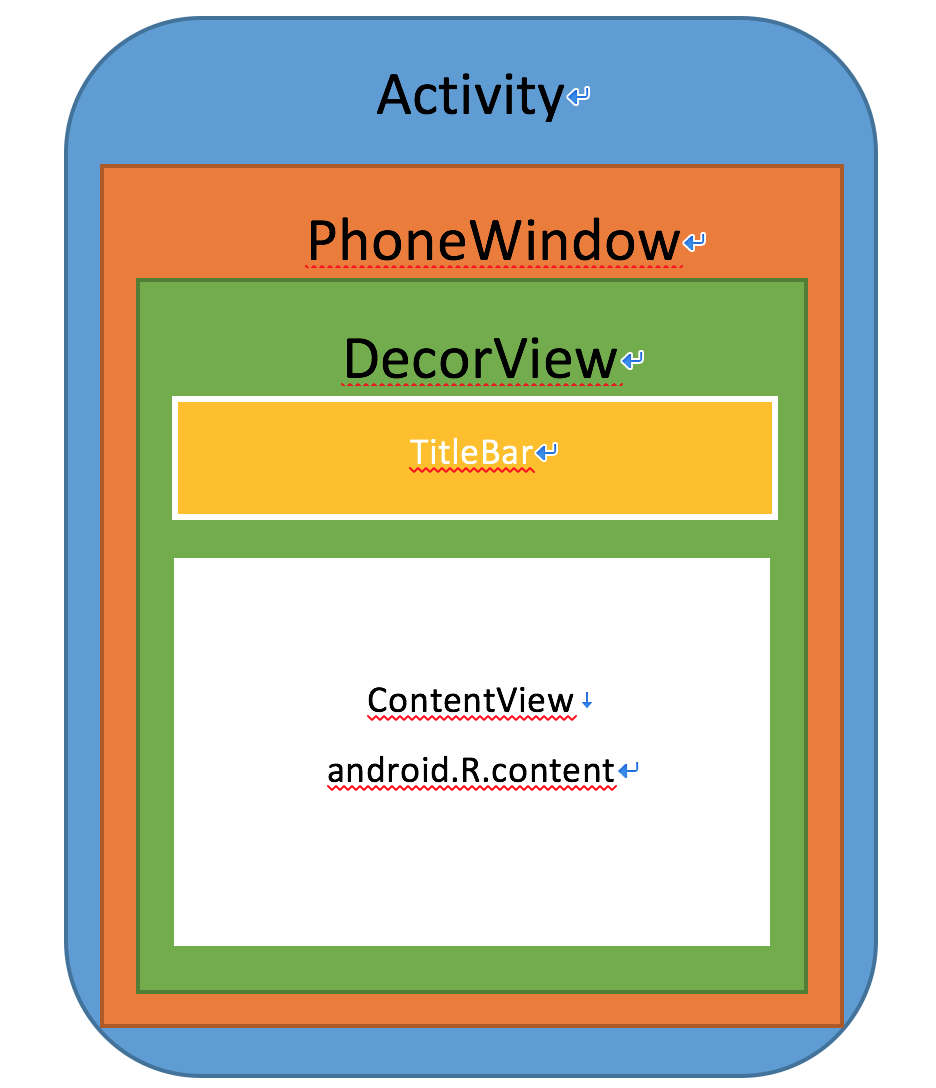
由上看出,通常DecorView实际上是一个FrameLayout,底下嵌套了LinearLayout,上面放的是TitleBar,下面放的是ContentView,从id可以看出为什么叫setContentView。这个TitleBar是ActionBar,通常我们开发都不会使用,直接取消掉了的。DecorView不是SDK的代码,关于更多只能从android的源码去获取了。ContentView是一个FrameLayout,我们所有的View都是在这里开始的,所以通常我用IDE分析界面的时候会看到顶层的根View是FrameLayout,就是它了。可以用Stetho来观察View的结构,具体看这篇blog。
1.1 关于DecorView
看源码我们会发现DecorView的定义如下:
private final class DecorView extends FrameLayout implements RootViewSurfaceTaker{}
调用setContentView()方法以后,会调用到PhoneWindow的setContentView方法,里面调用installDecor()方法,里面会调用generateDecor()方法来直接new出一个DecorView:
protected DecorView generateDecor() {
    return new DecorView(getContext(), -1);
}由于DecorView是FrameLayout,并没有什么布局样式可言,所以,这时候需要根据Activity的Theme主题设置寻找相应得布局来add到这个FrameLayout里面去。一般是会找到一个LinearLayout的布局,上方是title,下方是content,如上图所示;然后inflate这个布局,add到DecorView里面去,再去find出contentView进行判空处理。如下所示:
//...根据theme,寻找layoutResource

View in = mLayoutInflater.inflate(layoutResource, null);
decor.addView(in, new ViewGroup.LayoutParams(MATCH_PARENT, MATCH_PARENT));
mContentRoot = (ViewGroup) in;

ViewGroup contentParent = (ViewGroup)findViewById(ID_ANDROID_CONTENT);
if (contentParent == null) {
    throw new RuntimeException("Window couldn't find content container view");
}
由上可以看出ID_ANDROID_CONTENT其实就是android.R.content,而contentParent就是ContentView了,一般也就是FrameLayout,我们可以随意找到系统的一个theme主题布局R.layout.screen_simple看看就找到了。这里我们也明白了,为什么要先设置activity的主题,和布局特性,例如NO_TITLE之后才能设置布局。
当拿到了contentParent以后,就可以把我们的布局add进去了,setContentView的参数可以是id,可以是view,实际调用的是:
mLayoutInflater.inflate(layoutResID, mContentParent);
mContentParent.addView(view, params);
1.2 关于Window
由上可以知道Window也不是界面,真正的界面是View,它只是一个抽象的概念,根据官方的描述,Window类可以控制顶级View(DecorView)的外观和行为策略,它的唯一实现是PhoneWindow。从1.1也看到了Window是会去创建DecorView的,实际上它还会创建ViewRootImpl来进行绘制View。由上面我们也知道了,Activity对应于一个Window,而Window又是View的直接管理者,在其他形式下的Window都是这样的关系。View必须要有Window才能显示。
WindowManager是外界访问Window的入口,Window的实现位于WindowManagerService,所以这些交互是一个IPC的过程。如果我们想要创建Window等等,可以直接使用WindowManager的接口。WindowManager主要用来管理窗口的一些状态、属性、view增加、删除、更新、窗口顺序、消息收集和处理等。在WindowManager中还有一个重要的静态类LayoutParams,通过它可以设置和获得当前窗口的一些属性。
Window有三种类型,分别是应用类Window,如Activity的Window;子Window,如Dialog,它只能依附于特定的父Window,所以必须有Activity才能。系统类Window,如Toast,它也是一个Window来的。对于Dialog和Toast,其实都可以去看源码便会知道实际上它们是创建了一个Window来显示View的。实际上,PopupWindow、菜单等等这些的实现都是依托在Window的。
由此我们可以知道,整个应用,都会有各种各样的Window存在。
2 View的绘制流程
根据我们的经验,编写界面的xml文件是一个树状的结构,父节点通常是布局Layout,也就是一个ViewGroup,而叶子节点则是一个View,符合了ViewGroup包含View的关系。在Activity创建成功以后,便会创建ViewRoot的对象ViewRootImpl,并与DecorView联系起来,这是底层的系统源码,SDK上层并无法查看的。View的绘制流程是从ViewRoot的peformTraversals()方法开始的,分别对view进行测量、布局和绘制,最终才会显示在屏幕上。
由于是树状结构,所以从顶级的DecorView开始,分别往下遍历三个流程,实际是一个递归的过程。
2.1 Measure测量过程
这是从ViewRootImpl的performMeasure()方法开始,然后调用到View(DecorView)的measure()方法,最后会调用到View的onMeasure()方法。这都是SDK层的代码,可以直接查看的。每个View都会经历到这样的测量,如果是ViewGroup,则会递归测量子View。最终的结果是得到每一个View/ViewGroup的宽高。
2.1.1 关于MeasureSpec
在编写界面的时候,一般我们通过三种方式来确定View的宽高:match_parent、wrap_content和固定的尺寸。并且别的View,或者父节点也是由着三种方式来确定尺寸,可以想想,那么将会出现很不确定的组合情况,如果所有的view都是使用固定的尺寸,那么根本就不需要测量的流程了。正是因为这三种模式,view的尺寸是会受到父节点影响的,所以才需要测量。
在测量的过程中,是由上至下的递归过程,需要从父节点传递当前的mode和父节点的size这些参数到子节点,子节点根据父节点的参数测量好自己再递归传递下去。MeasureSpec就是这样的参数,它是一个32位的int类型,高两位是mode,剩下的30位是size。注意到的是,width和height分别对应一个int的MeasureSpec。
下面是三种Mode的说明:
- UNSPECIFIED,父容器不对View有任何限制,要多大给多大,一般用于系统内部。
- EXACTLY,父容器已经检测所需的精确大小,就是size的值,通常是match_parent和具体的数值两种情况。
- AT_MOST,父容器指定了一个可用的大小,就是size的值,子View不能超出这个值,通常对应于wrap_content情况。
具体看下面的表格即可。
2.1.2 测量过程
从DecorView开始,它的MeasureSpec由window的尺寸和自身的LayoutParam决定,然后通过ViewRootImpl的performMeasure()把值传递给子View,具体可用查看ViewRootImpl的getRootMeasureSpec()方法。子View拿到父View的MeasureSpec以后,结合自身的LayoutParam,包括padding和margin等,然后计算出自己的MeasureSpec,具体可用查看View和ViewGroup的measureChildWidthMargins()和getChildMeasureSpec()方法,最后子View拿到MeasureSpec以后就会调用child.measure(childWidthMeasureSpec, childHeightMeasureSpec)方法了,这正是上所说的重要流程。有些方法都是系统的源码,网上搜一下就有了,其他的自行去看就行。所以子View的MeasureSpec受到父View的影响,需要注意的是,如果对子View一次测量得不到结果,则可能会多次测量(都是理论说明,具体还得真去看源码逻辑了)。
1.如果子View是一个view
在子view的measure()方法里面会触发调用到onMeasure()方法,这两个方法都可以直接在View里面查看,最终在onMeasure方法里面会调用到setMeasuredDimension(),参数正是测量的宽高了。注意到的是,measure()方法是是final的,我们不能重写,只能重写onMeasure()方法了,通常自定义View的时候,需要重写这个方法来计算宽高。
2.如果子View是一个ViewGroup
ViewGroup是一个抽象类,它没有重写View的onMeasure方法,提供了measureChildren的方法,具体onMeasure的实现交给了子类,例如LinearLayout等等,因为它是需要递归去测量子View的尺寸的。
关于MeasureSpec有人已经总结出如下的一个表:
| 父View的MeasureSpec | 子View的LayoutParam | 子View的MeasureSpec |
|---|---|---|
| EXACTLY + Size | dp | EXACTLY + dp |
| EXACTLY + Size | wrap_content | AT_MOST + Size |
| EXACTLY + Size | match_parent | EXACTLY + Size |
| AT_MOST + Size | dp | EXACTLY + Size |
| AT_MOST + Size | wrap_content | AT_MOST + Size |
| AT_MOST + Size | match_parent | AT_MOST + Size |
| UNSPECIFIED + Size | dp | EXACTLY + dp |
| UNSPECIFIED + Size | wrap_content | UNSPECIFIED + 0 |
| UNSPECIFIED + Size | match_parent | UNSPECIFIED + 0 |
2.1.3 测量结果获取的时机
注意到的是测量过程和Activity的生命周期是不同步的,在生命周期的方法里面获取测量结果是不安全的,应该在一下三个时机获取:
- onWindowFocusChanged 这个方法,在Activity那个blog post有介绍了。
- view.post(runnable) 调用view的post方法来获取
- 使用ViewTreeObserver的回调
另外较好的是在onLayout方法里面获取测量宽高。
2.2 Layout布局过程
这是从performLayout()方法开始,调用到’layout()’方法,然后会调用到onLayout()的方法,同样道理递归下去,最终结果是得到View的四个顶点坐标,left,right,top,bottom和实际View的宽高。
在根View开始的时候如下所示:
private void performLayout() {
    ......
    mView.layout(0, 0, mView.getMeasuredWidth(), mView.getMeasuredHeight());
    ......
}
View的layout的方法如下:
public void layout(int l, int t, int r, int b) {
    if ((mPrivateFlags3 & PFLAG3_MEASURE_NEEDED_BEFORE_LAYOUT) != 0) {
        onMeasure(mOldWidthMeasureSpec, mOldHeightMeasureSpec);
        mPrivateFlags3 &= ~PFLAG3_MEASURE_NEEDED_BEFORE_LAYOUT;
    }

    int oldL = mLeft;
    int oldT = mTop;
    int oldB = mBottom;
    int oldR = mRight;

    boolean changed = isLayoutModeOptical(mParent) ?
            setOpticalFrame(l, t, r, b) : setFrame(l, t, r, b);

    if (changed || (mPrivateFlags & PFLAG_LAYOUT_REQUIRED) == PFLAG_LAYOUT_REQUIRED) {
        onLayout(changed, l, t, r, b);
        mPrivateFlags &= ~PFLAG_LAYOUT_REQUIRED;

        ListenerInfo li = mListenerInfo;
        if (li != null && li.mOnLayoutChangeListeners != null) {
            ArrayList<OnLayoutChangeListener> listenersCopy =
                    (ArrayList<OnLayoutChangeListener>)li.mOnLayoutChangeListeners.clone();
            int numListeners = listenersCopy.size();
            for (int i = 0; i < numListeners; ++i) {
                listenersCopy.get(i).onLayoutChange(this, l, t, r, b, oldL, oldT, oldR, oldB);
            }
        }
    }

    mPrivateFlags &= ~PFLAG_FORCE_LAYOUT;
    mPrivateFlags3 |= PFLAG3_IS_LAID_OUT;
}
可以看到layout是确定View本身的位置,初始的时候即是DecorView的位置,显然,DecorView的位置是DecorView的尺寸,然后里面会调用到onLayout,但是View和ViewGroup的onLayout方法都没有实现,交给了子类具体去实现。可以去看LinearLayout的onLayout方法。
要理解到的是,确定view的位置只需要left、top和测量宽高即可。
onLayout方法则会确所有子元素的位置。如果子元素是View则会用到View的测量宽高调用layout方法来确定位置;如果子元素是ViewGroup,则确定ViewGroup位置后会递归调用layout方法往下调用直到调用完毕。
由上可知,测量宽高形成于measure过程,最终宽高形成与layout过程,两者是相等的,只是赋值时机不同。
2.3 Draw绘制过程
这是从performDraw()方法开始,调用到’draw()’方法,然后会调用到onDraw()方法,唯一不同的是,这时候是通过dispatchDraw()方法了来传递到子View去绘制。
在根View执行performDraw()方法如下:
private void performTraversals() {
    ......
    final Rect dirty = mDirty;
    ......
    canvas = mSurface.lockCanvas(dirty);
    ......
    mView.draw(canvas);
    ......
}可以直接去看View的draw方法,里面的注释非常明晰,分了6个步骤,主要是绘制背景backgroud.draw(canvas),绘制自己onDraw(),绘制子元素dispatchDraw(),绘制装饰onDrawScrollBars()。
其中View是没有实现dispatchDraw()的,但是ViewGroup有实现,它是会递归去绘制所有的子View的。一般我们自定义View,需要实现onDraw()方法即可。
3 View的事件体系
当我们从手触碰到屏幕开始,Android系统会把这个触碰封装成为MotionEvent,然后把这个事件进行网上传递,直到应用层Activity,最后进行分发处理。至于这个是怎么从硬件底层传递到应用层Activity的,那就真的要深入研究系统才知道了;或者我们能从资料中研究知道事件的分发是从Activity开始的!对于MotionEvent对象,包含了三种类型,DOWN,MOVE和UP,从DOWN到UP的过程,包含了多个MotionEvent对象,称为一个事件序列。根据View的结构体系,而Activity实际上会把事件传递到PhoneWindow处理,它又会把事件传递给DecorView处理,最终DecorView把事件传递到我们定义的View上面去。
由View得树状结构可以理解到,这是一个递归的过程,事件从树根往下传递,每到一个节点都会问它一下处理(分发)的结果,如果返回true就是说明已经处理好了,事件不用再传递了;如果返回false就说明没有处理好,事件交回给你。
3.1 Activity的事件分发
Activity的事件是从dispatchTouchEvent()开始的,直接可以看到它的代码如下:
public boolean dispatchTouchEvent(MotionEvent ev) {
    if (ev.getAction() == MotionEvent.ACTION_DOWN) {
        onUserInteraction();
    }
    if (getWindow().superDispatchTouchEvent(ev)) {
        return true;
    }
    return onTouchEvent(ev);
}看到如果是事件序列开始的第一个DOWN事件,是会调用onUserInteraction(),但是这个方法是个空实现,根据描述,通常在屏保应用中会去重写这个方法。然后会调用Window的superDispatchTouchEvent(ev),如果Window返回true,则是处理了这个事件,直接返回true,否则就调用onTouchEvent(ev),Activity自己处理这个事件。
Window是一个抽象类,它只有一个实现PhoneWindow,看源码知道Window的处理如下:
public boolean superDispatchTouchEvent(MotionEvent event) {
    return mDecor.superDispatchTouchEvent(event);
}可以知道实际上是调用了DecorView的superDispatchTouchEvent(event)来处理的,这个方法里面实际上也是调用了super.dispatchTouchEvent(event)方法的,由前面我们知道DecorView是继承FrameLayout的,因此,触发的ViewGroup的方法,事件是交给了ViewGroup来分发了。
3.2 ViewGroup的事件分发
DecorView根据分发逻辑,事件是会走到TitleBar或者ContentView的。ViewGroup的dispatchTouchEvent()方法非常的复杂,所有细节有需要再去研究,核心的就几点,先看前面的一部分代码:
// Handle an initial down.
if (actionMasked == MotionEvent.ACTION_DOWN) {
    // Throw away all previous state when starting a new touch gesture.
    // The framework may have dropped the up or cancel event for the previous gesture
    // due to an app switch, ANR, or some other state change.
    cancelAndClearTouchTargets(ev);
    resetTouchState();
}

// Check for interception.
final boolean intercepted;
if (actionMasked == MotionEvent.ACTION_DOWN
        || mFirstTouchTarget != null) {
    final boolean disallowIntercept = (mGroupFlags & FLAG_DISALLOW_INTERCEPT) != 0;
    if (!disallowIntercept) {
        intercepted = onInterceptTouchEvent(ev);
        ev.setAction(action); // restore action in case it was changed
    } else {
        intercepted = false;
    }
} else {
    // There are no touch targets and this action is not an initial down
    // so this view group continues to intercept touches.
    intercepted = true;
}DOWN事件刚进来会做一些初始化的工作,重要的是重置了FLAG_DISALLOW_INTERCEPT这个标记和设置mFirstTouchTarget为null。接下来就要询问ViewGroup自身是否需要拦截这个事件了,即调用了onInterceptTouchEvent()方法。要注意到的是disallowIntercept是会影响拦截的,这个标记可以通过调用requestDisallowInterceptTouchEvent()方法来设置,默认这个标记都是false的。
为了不用每次都判断要不要拦截,它是这么做的,从if条件看出,如果第一个DOWN事件来到,是要判断一下自己要不要拦截,要是拦截成功,那么intercepted是true,mFirstTouchTarget会一直是null,下个MOVE或者UP事件来的时候,intercepted默认设置为true了。要是拦截onInterceptTouchEvent()返回false或者不允许拦截,那么会把事件交给了子元素处理。
实际上,ViewGroup的onInterceptTouchEvent方法默认返回false,不拦截事件。
如果子元素处理成功了,mFirstTouchTarget会被赋值指向子元素,那么这些事件都需要调用ViewGroup来判断是否要拦截。只有在当DOWN事件拦截成功以后才不会继续判断。
从addView的倒序开始遍历子view,即从浮在上层的view开始,调用子View的dispatchTouchEvent()方法来处理事件,一旦返回true就退出循环了:
newTouchTarget = addTouchTarget(child, idBitsToAssign);
alreadyDispatchedToNewTouchTarget = true;
break;
并且给mFirstTouchTarget赋值了。如果所有子元素都不处理事件,即返回了false,那么会触发下面的代码:
// Dispatch to touch targets.
if (mFirstTouchTarget == null) {
    // No touch targets so treat this as an ordinary view.
    handled = dispatchTransformedTouchEvent(ev, canceled, null,
            TouchTarget.ALL_POINTER_IDS);
}
注意到第三个参数为null,即传递的child为null,然后实际上会调用到ViewGroup的父类的dispatchTouchEvent()方法,即是View的方法,本质上,这个方法里面会调用到onTouchEvent方法和OnTouchListener的onTouch方法。而ViewGroup是没有重写onTouchEvent方法的,交给了具体的Layout去实现了。
注意到,子元素可以实际上处理了事件,然后还是返回false表明没有处理的,我们在自定义View的时候,可以根据实际需求这样做。
3.3 View的事件分发
View底下没有了子元素,所以它的分发就会很简单,dispatchTouchEvent()方法会比较简单,看核心的代码如下:
if (onFilterTouchEventForSecurity(event)) {
    //noinspection SimplifiableIfStatement
    ListenerInfo li = mListenerInfo;
    if (li != null && li.mOnTouchListener != null
            && (mViewFlags & ENABLED_MASK) == ENABLED
            && li.mOnTouchListener.onTouch(this, event)) {
        result = true;
    }

    if (!result && onTouchEvent(event)) {
        result = true;
    }
}可以看到是首先判断了有没有OnTouchListener,有的话就先执行它的onTouch()方法,如果返回false,那么才会去执行onTouchEvent()方法的,即它的优先级会更高一些。至于View的onTouchEvent()方法,逻辑比较复杂,包括了处理各种CLICKABLE和LONG_CLICKABLE属性,在UP事件中还会触发performClick()方法,实际上是调用了OnClickListener里面的onClick()方法。
3.4 事件冲突解决方案
由上面的事件分发机制可以知道,如果没有处理好事件的话,就会发生冲突,举个例子,父组件支持左右滑动,子组件支持上下滑动;又或者它们滑动的方向是一致的情况,这些事件该怎么处理?
显然,解决的套路是拦截事件,不要让它传递。在父容器里面重写onInterceptTouchEvent方法,然后根据实际的情况逻辑是否要消耗这个事件来返回是否拦截这个事件。有一点要注意的是,如果在DOWN事件拦截,那么该事件序列之后的所有事件都将不能再传递到子元素了,应该在MOVE事件处理,因为他每次都要调用onInterceptTouchEvent判断的,所以DOWN事件都返回false。
4 自定义View控件
由上面知道了自定义控件需要处理view的测量、布局和绘制过程,还需要处理事件冲突等等的问题。通常自定义的View有以下几种情况:
4.1 继承View
这是比较原生的做法,需要做的事情比较多,但是一般我们是重写onDraw()方法,如果要支持wrap_content和padding属性,这是需要我们自己处理的。如果是wrap_content模式,对应specMode是AT_MOST,采用的specSize是parentSize,结果和match_parent一样,所以要处理的话就在重写onMeasure方法里面使用一个默认的值。对于TextView这些,它是另外计算字体的宽高的。
这种情况完全是不用重写onLayout方法的,一般是onMeasure和onDraw方法即可。
4.2 继承ViewGroup
这也是比较原生的做法,实现不同的布局,这时候我们是必须重写测量、布局的过程,那是比较复杂的事情。
4.3 继承特定的View
一般是扩展某些View的功能。
4.4 继承特定的ViewGroup
一般是扩展某些布局的功能。
4.5 自定义控件属性
当自定义一个控件后,可以给这个控件自定义更多属性,例如我自定义一个ImageView,给它一个属性,是否圆角。
1. 在res/values下创建attrs.xml文件,里面定义好属性名称和类型:
<?xml version="1.0" encoding="utf-8"?>
<resources>
    <declare-styleable name="roundedimageview">
        <attr name="border_thickness" format="dimension" />
        <attr name="border_inside_color" format="color" />
        <attr name="border_outside_color" format="color" />
    </declare-styleable>
</resources>
name=”roundedimageview” 是属性的总体名称
name=”border_thickness” 是具体的每一个属性
format=”color” 是说明这个属性只能填颜色值
2. 编写自定义控件类
3. 在布局文件里面引用新的命名空间。
xmlns:zg="http://schemas.android.com/apk/res/org.zhangge.almightyzgbox_android" org.zhangge.almightyzgbox_android这个是我的包名
使用新的自定义控件和自定义属性
<org.zhangge.ui.image.ZGImageView
            android:id="@+id/myView"
            android:layout_width="fill_parent"
            android:layout_height="wrap_content"
            android:layout_marginBottom="5dip"
            zg:border_thickness="XXX"
            zg:border_inside_color="XXX"
            zg:border_outside_color="XXX" />
4. 在自定义控件类里面的构造方法获取这个属性值:
//获得实例
TypedArray typeArray = context.obtainStyledAttributes(attrs, R.styleable.roundedimageview);

//从typeArray获取相应值,第二个参数为默认值,如第一个参数在atts.xml中没有定义,返回第二个参数值
thickness = typeArray.getDimension(R.styleable.roundedimageview_border_thickness, 9);
point_normal_color = typeArray.getColor(R.styleable.roundedimageview_border_inside_color, 0x000000);
point_seleted_color = typeArray.getColor(R.styleable.roundedimageview_border_outside_color, 0xffff07);

typeArray.recycle();
获得了属性,就可以自己去构造这个view了。注意:
属性的命名规则是:采取的名字_属性这种格式。例如:R.styleable.roundedimageview_border_thickness
注意:一定要执行typeArray.recycle()回收。
4.6 关于attrs.xml
显然attrs是Attributes的意思,顾名思义,这个文件就是配置属性的。从上面知道它的根节点是<resources>,然后我自定义view属性的时候使用到了<declare-styleable>这个节点,就用上面的例子,在R文件里面打开R.styleable.roundedimageview发现里面是一个int数组!原来在attrs.xml里面,<resources>节点下是可以直接使用<attr>这个节点的。很容易就明白到,<declare-styleable>节点是帮助我们分组,清晰分开各个自定义的属性。下面是等价的:
int[] attrs = {R.attr.border_thickness, R.attr.border_inside_color, R.attr.border_outside_color};
int[] attrs2 = R.styleable.roundedimageview;
4.7 关于TypedArray和AttributeSet
从4.5那里知道自定义View的构造方法里面除了用到Context以外,还有一个AttributeSet的参数,利用这个set和4.6的attrs就能获取TypedArray,然后就可以获取自定义view的自定义属性值了,并且最后还要recycle()!。
直接跟进去context.obtainStyledAttributes(attrs, R.styleable.roundedimageview);方法,发现里面调用的是:
/**
 * Retrieve styled attribute information in this Context's theme.  See
 * {@link Resources.Theme#obtainStyledAttributes(AttributeSet, int[], int, int)}
 * for more information.
 *
 * @see Resources.Theme#obtainStyledAttributes(AttributeSet, int[], int, int)
 */
public final TypedArray obtainStyledAttributes(
        AttributeSet set, int[] attrs) {
    return getTheme().obtainStyledAttributes(set, attrs, 0, 0);
}再继续跟进去,发现Theme是Resources的内部类,obtainStyledAttributes()有如下的注释
/**
* Return a TypedArray holding the attribute values in
* <var>set</var>
* that are listed in <var>attrs</var>. In addition, if the given
* AttributeSet specifies a style class (through the "style" attribute),
* that style will be applied on top of the base attributes it defines.
*
* <p>Be sure to call {@link TypedArray#recycle() TypedArray.recycle()} when you are done
* with the array.
*
* <p>When determining the final value of a particular attribute, there
* are four inputs that come into play:</p>
*
* <ol>
* <li> Any attribute values in the given AttributeSet.
* <li> The style resource specified in the AttributeSet (named
* "style").
* <li> The default style specified by <var>defStyleAttr</var> and
* <var>defStyleRes</var>
* <li> The base values in this theme.
* </ol>
*
* <p>Each of these inputs is considered in-order, with the first listed
* taking precedence over the following ones. In other words, if in the
* AttributeSet you have supplied <code><Button
* textColor="#ff000000"></code>, then the button's text will
* <em>always</em> be black, regardless of what is specified in any of
* the styles.
*
* @param set The base set of attribute values. May be null.
* @param attrs The desired attributes to be retrieved.
* @param defStyleAttr An attribute in the current theme that contains a
* reference to a style resource that supplies
* defaults values for the TypedArray. Can be
* 0 to not look for defaults.
* @param defStyleRes A resource identifier of a style resource that
* supplies default values for the TypedArray,
* used only if defStyleAttr is 0 or can not be found
* in the theme. Can be 0 to not look for defaults.
*
* @return Returns a TypedArray holding an array of the attribute values.
* Be sure to call {@link TypedArray#recycle() TypedArray.recycle()}
* when done with it.
*
* @see Resources#obtainAttributes
* @see #obtainStyledAttributes(int[])
* @see #obtainStyledAttributes(int, int[])
*/
public TypedArray obtainStyledAttributes(AttributeSet set,
int[] attrs, int defStyleAttr, int defStyleRes);以上的注释解释得很清楚了,这个方法返回的TypedArray帮助我们获取AttributeSet里面的属性值。显然AttributeSet就是一个属性的集合,查看这个接口,可以看到注释的第一句话是:
A collection of attributes, as found associated with a tag in an XML document.
就是说这个set里面包含了这个View的所有属性,包括了布局里面定义的android:layout_width这些等等。实际上这个set的生成是由LayoutInflater完成的。要验证set的话可以直接调它的方法来打印里面的值即可。
当我们android:layout_width属性的值不是一个绝对的dp或者px,而是@到了dimen的时候,AttributeSet是不会帮我们去读取的,set读取到的只是R里面的id,这个时候就需要TypedArray来帮我们读取了,为什么要recycle?可以点进去看方法,实际调用了SynchronizedPool来release一个TypedArray,而这个代码是看不到的了,不过也可以想想,读取的属性值都需要打开文件,这些IO资源是系统接口,肯定要释放的。当然我们也是可以不使用TypedArray的,自己来获取属性值,不过就很麻烦咯,要处理各种情况。
4.8 关于styles.xml
上面的方法obtainStyledAttributes的注释还有很多没看完的,而且还有好几个重载的方法,都跟style有关。我们新建一个项目的时候styles.xml里面是这样的:
<resources xmlns:android="http://schemas.android.com/apk/res/android">
    <!--
        Base application theme, dependent on API level. This theme is replaced
        by AppBaseTheme from res/values-vXX/styles.xml on newer devices.
    -->
    <style name="AppBaseTheme" parent="android:Theme.Light">
        <!--
            Theme customizations available in newer API levels can go in
            res/values-vXX/styles.xml, while customizations related to
            backward-compatibility can go here.
        -->
    </style>
    <!-- Application theme. -->
    <style name="AppTheme" parent="AppBaseTheme">
        <item name="android:windowNoTitle">true</item>
    </style>
</resources>可以看到,根节点依然是<resources>,然后子节点便是<style>。显然,上面定义了两个主题,分别是AppBaseTheme和AppTheme,居然是有继承关系的!顶层父主题是android:Theme.Light。另外AppTheme的子节点是<item>,这个item定义了一个属性是android:windowNoTitle。
很明显可以看出styles.xml和attrs.xml的区别,attrs是定义了有哪些属性,styles则是定义了这些属性的值。例如,上面4.5在attrs定义了roundedimageview这些属性,那么就可以在styles里面定义一个style来给这些属性赋值:
<style name="RoundedImageViewAppearance">
    <item name="border_thickness">1dp</item>
    <item name="border_inside_color">@android:color/black</item>
    <item name="border_outside_color">@android:color/red</item>
</style>
这个时候就可以在布局里面使用这个style了,而不需要再配置每一个属性了。
<org.zhangge.ui.image.ZGImageView
            android:id="@+id/myView"
            android:layout_width="fill_parent"
            android:layout_height="wrap_content"
            android:layout_marginBottom="5dip"
            style="@style/RoundedImageViewAppearance" />
明显能理解到style就是一套样式的意思,也就是主题的意义了嘛。另外通过这样的style配置的值也是会进入到AttributeSet里面的了。
只要我们使用的view需要一个主题的时候就可以使用了R.style.xxx了。例如,在新建一个Dialog的时候可以这样:
AlertDialog.Builder builder = new AlertDialog.Builder(context, R.style.DialogFullscreen);
Dialog dialog = builder.create();
Builder的第二个参数是theme。
4.9 关于obtainStyledAttributes()方法
上面说到context的obtainStyledAttributes()方法,有四个重载的,分别如下:
public final TypedArray obtainStyledAttributes(
        int[] attrs) {
    return getTheme().obtainStyledAttributes(attrs);
}
public final TypedArray obtainStyledAttributes(
        int resid, int[] attrs) throws Resources.NotFoundException {
    return getTheme().obtainStyledAttributes(resid, attrs);
}
public final TypedArray obtainStyledAttributes(
        AttributeSet set, int[] attrs) {
    return getTheme().obtainStyledAttributes(set, attrs, 0, 0);
}
public final TypedArray obtainStyledAttributes(
        AttributeSet set, int[] attrs, int defStyleAttr, int defStyleRes) {
    return getTheme().obtainStyledAttributes(
        set, attrs, defStyleAttr, defStyleRes);
}
明显看到,实际上都是调用了Theme的同名方法,看看有几个重载方法:
public TypedArray obtainAttributes(AttributeSet set, int[] attrs);
public TypedArray obtainStyledAttributes(int[] attrs);
public TypedArray obtainStyledAttributes(int resid, int[] attrs) throws NotFoundException;
public TypedArray obtainStyledAttributes(AttributeSet set, int[] attrs, int defStyleAttr, int defStyleRes);其中obtainAttributes()是Resources的方法,其他三个才是Theme的方法。关注到的参数就四个,set和attrs都已经知道了,另外两个是defStyleAttr和defStyleRes。顾名思义,就是default style attribute和default style resource。
看上面的4.7的注释如下:
* @param defStyleAttr An attribute in the current theme that contains a
*                     reference to a style resource that supplies
*                     defaults values for the TypedArray.  Can be
*                     0 to not look for defaults.
* @param defStyleRes A resource identifier of a style resource that
*                    supplies default values for the TypedArray,
*                    used only if defStyleAttr is 0 or can not be found
*                    in the theme.  Can be 0 to not look for defaults.
defStyleAttr的意思是当前主题里面的一个属性值,指向了一个定义的style,提供了默认值给TypedArray,如果是0则不会去查找。defStyleRes的意思是则是直接读取styles.xml里面定义的一个style。只有当defStyleAttr是0或者查找不到的前提才会去使用defStyleRes。
例如:
在attrs.xml里面定义了这个属性,并没有在
<attr name="mySwitchStyle" format="reference"/>然后在styles.xml里面定义这个style:
<style name="switch_light">
    <item name="mytrack">@drawable/switch_track_holo_light</item>
    <item name="thumb">@drawable/switch_inner_holo_light</item>
    <item name="textOn">@string/settings_switcher_textOn</item>
    <item name="textOff">@string/settings_switcher_textOff</item>
    <item name="mythumbTextPadding">0dip</item>
    <item name="myswitchMinWidth">60dip</item>
    <item name="myswitchPadding">0dip</item>
    <item name="myswitchTextAppearance">@style/TextAppearance</item>
</style>
然后在AppTheme里面配置了这个属性:
<style name="AppTheme" parent="AppBaseTheme">
    <item name="android:windowNoTitle">true</item>
    <item name="mySwitchStyle">@style/switch_light</item>
</style>那么,defStyleAttr这个参数就可以传R.attr.mySwitchStyle这个值了,而defStyleRes则是可以传R.style.switch_light。
继续看obtainAttributes()的注释,这样说:
* <p>When determining the final value of a particular attribute, there
* are four inputs that come into play:</p>
*
* <ol>
* <li> Any attribute values in the given AttributeSet.
* <li> The style resource specified in the AttributeSet (named
* "style").
* <li> The default style specified by <var>defStyleAttr</var> and
* <var>defStyleRes</var>
* <li> The base values in this theme.
* </ol>
*
* <p>Each of these inputs is considered in-order, with the first listed
* taking precedence over the following ones. In other words, if in the
* AttributeSet you have supplied <code><Button
* textColor="#ff000000"></code>, then the button's text will
* <em>always</em> be black, regardless of what is specified in any of
* the styles.上面的意思是说属性值的优先级,目前可以知道四种方式设置属性值,因此在设置值的时候会有优先级问题,四种方式如下:
1.在布局里面xml直接设置值,也是我们最常用的方式。
2.在布局里面xml通过style设置值,即上面4.8所说的。这两点的值都会直接出现在AttributeSet里面的。
3.通过defStyleAttr和defStyleRes获取的值。
4.默认在主题里面的值。
优先级是由上至下的。
Sunday don't come easily!
